
The fishtail is the flattest, fastest bracelet weave on this site — and the one that uses the least cord. A single working cord wraps around two straight core cords, making a flat, flexible band that sits neatly on the wrist and works up quicker than a cobra. This tutorial shows you how to make a single-color fishtail survival bracelet with a plastic side-release buckle.
You can finish this bracelet with any closure — shackles, clips, buckles, knots, beads and more — but the tutorial uses the standard side-release buckle, the same one as the cobra bracelet.
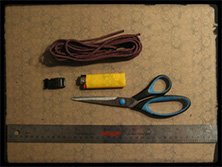
What you need
- 10 ft of 550 paracord (Type III), one color
- Side-release buckle
- Scissors
- Lighter
- Tape measure or ruler
That is the whole kit. The fishtail setup is the only fiddly part — read steps 3 through 6 carefully and follow the diagrams, and the braiding itself is simple.
How much cord
A fishtail weave uses about 8 inches of cord for every finished inch of bracelet — the lightest of the common weaves, and noticeably less than the cobra’s 12 inches per inch. A 7.5-inch bracelet needs about 5 feet of cord. The materials list calls for 10 feet because the setup folds the cord and doubles it through the buckles, with one short end and one long working end — the extra length is the working end, not waste. For any wrist size, the Paracord Length Calculator works out the exact cut length.
Steps
- Measure your wrist. Wrap a string, cord, or small rope around your wrist — very snug, but not overly tight. Mark a line across the two crossing cords with a marker, then straighten the string out and measure from the first line to the second. In the example below the wrist measures about 8 inches, so the bracelet will be sized at 9 inches (wrist + 1 inch).

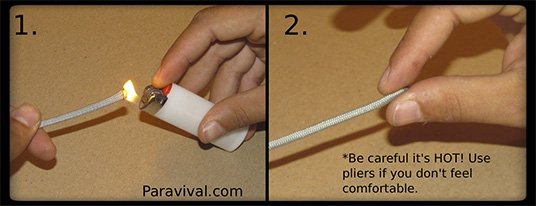
- Melt the ends. If the inner strands — the “guts” of the cord — are exposed a bit, cut about a centimeter off the end so it burns clean. Melt the ends for 3 to 4 seconds, rotating the cord for an even burn, then squeeze the melted end with your fingers (wet them first if you like) or a pair of pliers to form a nice, thin end.
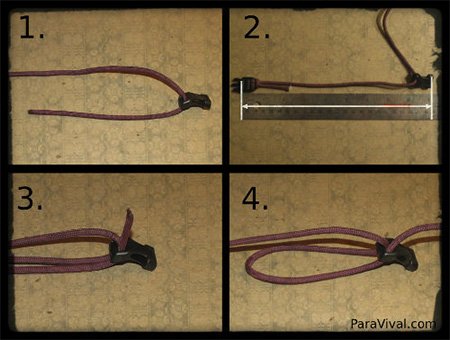
- Make the first cow hitch. You will make a cow hitch on the male part of the buckle. Fold your cord in half so the two ends meet, and place both ends through the male buckle as shown in the diagram. Then place the two ends back through the loop created in the first step and pull one of the cords through until the knot is tightened. Adjust the cords so one cord is hanging out about 1 inch and the other is the rest of the cord, as shown in part 3 of the diagram.

- Make the second cow hitch and take your first measurement. Take the long piece of cord you have left and place it through the female part of the buckle. In part 2 of the diagram, make your first measurement: the cord is doubled through the buckle here, so measure the doubled length against your wrist size (wrist + 1 inch). Then take your loose cord again and come back up through the female buckle, and pull the cord through until you are left with a little loop, as shown in part 4 of the diagram.
- Complete the second cow hitch and re-measure. Place the male part of the buckle through the loop created in step 4, then place the loose cord through the same loop. Pull everything tight and you should have your second cow hitch. Adjust everything so it lines up with your measurement from step 4, and measure again in this step to confirm.
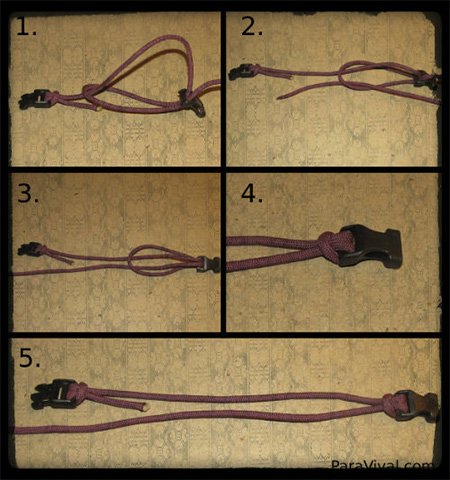
- Weave the loose cord through the first cow hitch. Take your loose cord and weave it from underneath the male buckle part, through the middle of the bracelet, then continue it underneath the “loop” part of the cow hitch. Pull the loose cord through all the way until it is nice and tight. Now your loose end is ready to braid the bracelet itself.

- Start the fishtail braid. The two cords running from top to bottom are your “core cords”. Wrap the loose cord around the back of core cord 1 and up through the middle of the two core cords, then tighten. Continue the loose cord around the back of core cord 2 and up through the middle, and tighten your braids again.

- Keep braiding. Repeat step 7: weave the loose cord under core cord 1 and up through the middle of the two core cords, tighten, then under core cord 2 and up through the middle, and tighten. Part 4 of the diagram shows the “break down” of the weave — how each pass sits against the last.

- Work down to the end. This is what the weave looks like halfway down. End the same way once you get down to the female part of the buckle — pull one cord at a time as you tighten, which is easier than pulling both at once.
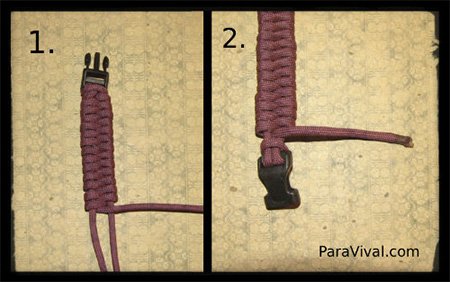
- Tie off the bracelet. Take your time on this step — it can get a little confusing. Take your loose cord and wrap it underneath both core cords, then continue it through the middle of both core cords on the top. The diagram shows what it should look like; follow the “blown up” (enlarged) part of the diagram, and check the underneath side too.

- Finish the tie-off. Pull the loose end through the loop created in the previous step, then pull everything nice and tight and prepare to cut the excess cord. Make sure it is nice and tight before you cut.
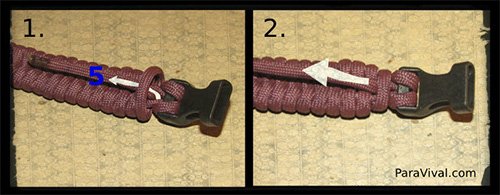
- Cut and melt the end. Cut the excess cord, leaving roughly 1/4 of an inch. Melt the end for roughly 3 to 4 seconds, or until all the frays are gone, and press the melted end flat with your fingers or pliers.

The finished fishtail weave paracord bracelet

Tips
- Keep the two core cords straight and parallel the whole way down. If they twist, the fishtail pattern goes crooked and will not lie flat.
- Tighten each pass the same amount. Uneven tension is what makes a fishtail lumpy instead of flat and even.
- Take your time on the tie-off in step 10 — it is the one confusing step, and the diagram’s enlarged view is the guide. Get it right and the end is invisible.
FAQ
How much paracord does a fishtail bracelet need?
About 8 inches of cord per finished inch — so a 7.5-inch bracelet needs about 5 feet. The Paracord Length Calculator gives the exact number for your wrist size.
Why does the fishtail use less cord than a cobra?
The fishtail is a flatter, more open weave: a single working cord wraps around two straight core cords, while the cobra ties a full knot with two working cords on every pass. That is why the fishtail uses about 8 inches per finished inch against the cobra’s 12 — and why it works up faster and lies flatter on the wrist.