
The cobra bracelet with a buckle is the classic paracord bracelet — the one most people make first. A single color of 550 cord, woven in the cobra (Solomon bar) pattern over two core strands and closed with a side-release buckle. Worn every day, it puts about 8 feet of usable cord on your wrist, ready to unravel the moment you need it.
This tutorial walks through the whole build, from measuring your wrist to the final melt. If you have never tied a cobra knot before, start here: every weave on this site builds on the knot you learn in this bracelet.
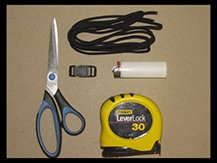
What you need
- 12 ft of 550 paracord (Type III), one color
- Side-release buckle
- Scissors
- Lighter
- Tape measure or ruler
That is the whole kit. A bracelet jig helps hold the tension, but it is not required — a clipboard, or your own knee holding the buckle end steady, works fine.
How much cord
A cobra weave uses about 12 inches of cord for every finished inch of bracelet — roughly 1 foot per inch. Measure your wrist, add about 1 inch for a comfortable fit, and that total is your finished length:
- 7 in wrist → 8 in finished → about 8 ft of cord
- 7.5 in wrist → 8.5 in finished → about 8.5 ft of cord
- 8 in wrist → 9 in finished → about 9 ft of cord
The materials list calls for 12 ft because a little extra cord is cheap insurance — you trim the tails at the end, and you cannot add cord mid-weave. For any wrist size, the Paracord Length Calculator works out the exact cut length for you.
Steps
- Measure your wrist. Wrap a piece of string or rope around your wrist, snug but not tight, and mark where it overlaps. Straighten the string out and measure from mark to mark — that is your wrist size. The wrist in the photo below measures 8 inches.

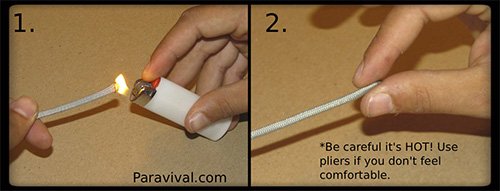
- Cut and melt the ends. If the inner strands — the “guts” of the cord — are exposed at the cut end, trim about a centimeter so the end is clean. Hold the lighter flame on the end for 3 to 4 seconds, rotating the cord for an even melt, then squeeze the melted end flat with your fingertips or a pair of pliers so it will not fray.
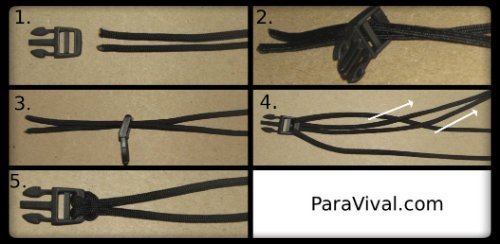
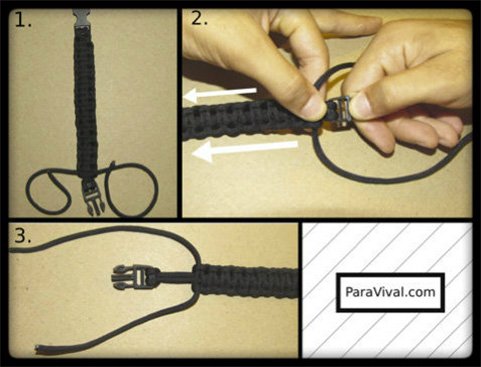
- Attach the buckle. Fold your cord in half so you are working with both ends together (the example here uses a 10 ft piece for an 8-inch wrist). With the buckle arced inward, thread both cords through the lower slot, then pull the loose ends through the loop that forms on the other side and pull everything tight. The knot should sit snug against the buckle.
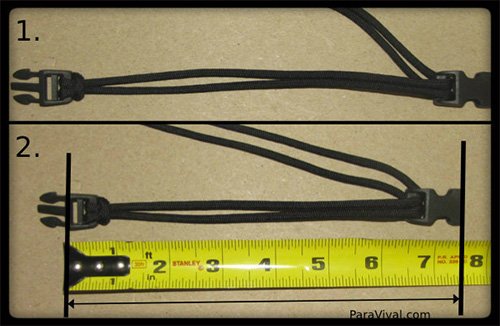
- Set the finished length. Run the two core strands through the second buckle half and set the buckle-to-buckle distance to your finished length, measuring from the middle of the male half of the buckle. Add 1 inch to your wrist measurement: for the example in the diagram, a 6.5-inch wrist means setting the cord to 7.5 inches.
- Tie the first cobra knot. Each move below matches a numbered part of the diagram. Position the bracelet as shown in part 1. Take the left cord and thread it under the core strands. Take the right cord and pass it under the left cord, then over the core strands, then through the loop the left cord made. Pull tight to form the knot.

- Tie the second cobra knot. Repeat the same knot, mirrored — start with the right cord this time. Right cord under the core strands; left cord under the right cord; left cord over the core strands; left cord through the loop the right cord made. Pull tight. Each pair of knots makes one flat bar of the weave.

- Keep alternating to the buckle. Alternate the two knots — left-start, right-start — until the weave reaches the far buckle, pushing each new knot up snug against the last. Do not pull the knots too tight as you go. If you run out of room before you reach the buckle, hold the male buckle and pull on the braid to draw up the slack; that frees room to keep braiding.
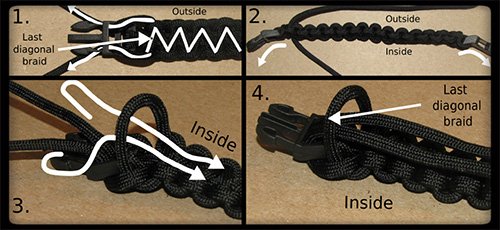
- Pull the excess cord through the second slit. Find the last diagonal braid on the inside of the bracelet and pull it up to form a loop. Thread the loose cord ends through the remaining slit of the male buckle, then pull them through the loop you just formed. Done right, the ends are locked in place.
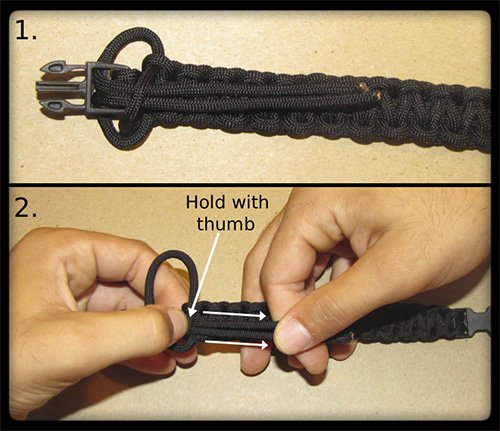
- Tighten everything up. Hold the last diagonal braid down with your thumb and pull the loose cords — one at a time, which is easier — until all the slack is gone and the weave is snug. A snug finish is what keeps the bracelet neat and lets it deploy cleanly when you need the cord.
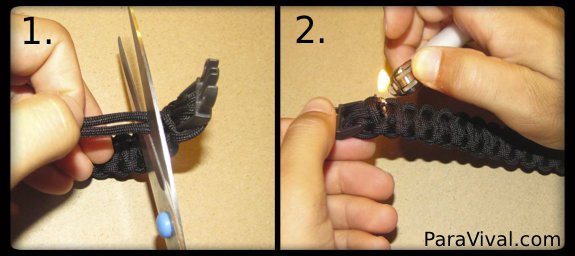
- Final cut, final melt. Cut the remaining cord ends, leaving about 1/8 to 1/4 inch. Melt each end with the lighter and press it flat with your fingers or pliers so it cannot fray or pull through.
The finished one-color cobra weave paracord bracelet

Tips
- Keep your tension even and push each new knot up snug against the last one. Uneven tension is what makes a bracelet twist or go lumpy.
- If the bracelet starts twisting like a barber pole, you are starting every knot on the same side. Alternate strictly: left, then right.
- Cut long. The few inches you trim at the end cost almost nothing; running short mid-weave costs the whole bracelet.
FAQ
How much paracord do I need for a bracelet?
For a cobra weave, about 1 foot of cord per finished inch — so a 7.5-inch bracelet takes about 7.5 feet, plus a little margin. The Paracord Length Calculator gives the exact number for your wrist size and weave.
Can I make this bracelet in two colors?
Yes. Split the total cord 50/50 between two colors and join them at the center before you start weaving. The two-color paracord bracelet tutorial walks through the split and the same cobra weave.